")
Back to Archived Journals » Journal of Neurorestoratology » Volume 6
Proliferation and differentiation of human fetal brain neural stem cells in vitro
Authors McGrath EL, Gao J, Wu P
Received 10 August 2017
Accepted for publication 16 November 2017
Published 10 January 2018 Volume 2018:6 Pages 19—27
DOI https://doi.org/10.2147/JN.S148794
Checked for plagiarism Yes
Review by Single anonymous peer review
Peer reviewer comments 3
Editor who approved publication: Prof. Dr. Hongyun Huang
Erica L McGrath,1 Junling Gao,1 Ping Wu1,2
1Department of Neuroscience and Cell Biology, University of Texas Medical Branch, Galveston, TX, USA; 2Beijing Institute for Brain Disorders, Capital Medical University, Beijing, People’s Republic of China
Abstract: Primary human fetal brain neural stem cells (hNSCs) are a unique non-genetically modified model system to study molecular mechanisms underlying human neural development, to model human diseases, and to screen drugs or validate new treatments. They may also be used for cell transplantation to treat various neurological diseases. This protocol details our methods that can be used to expand hNSCs in culture as well as how to differentiate them into various neuronal lineages and astrocytes.
Keywords: neural stem cell, proliferation, differentiation, neuron, astrocyte
Introduction
Understanding the regulation of neural stem cell proliferation, differentiation, and survival is critical for developing treatments for a variety of developmental and neurodegenerative disorders. Many of the mechanisms governing these functions remain poorly understood.1,2 Researchers have utilized animal models to study neurological development and degeneration in vivo.3 While animal models have yielded valuable information, they are both time consuming and genetically different from humans. Researchers have also employed genetic manipulations to induce differentiated human cells to become stem cells.4 These cells are commonly referred to as induced pluripotent stem cells. While these cells are human and have the advantage of being isolated directly from patients, the genetic manipulations to induce pluripotency provide an additional variable into an already complex system. In order to study some neurological disorders, use of non-genetically modified primary human neural stem cells is optimal.
Human fetal brain neural stem cells (hNSCs) provide a unique culturing system to understand the mechanisms governing hNSCs behavior without any genetic modifications. These cells can be expanded in culture and maintained as stem cells, or differentiated into various types of neurons and astrocytes. Culture of these cells has been used in multiple studies ranging from infectious disease to amyotrophic lateral sclerosis.5–7 This system is particularly powerful if multiple donors can be found as individual differences can be evaluated. However, the technical challenges associated with effect and reproducible hNSC culture still present a barrier in the field. Even though many people currently use similar growth factors, media, and isolation techniques, there is considerable variability in hNSC behavior in culture over time among laboratories. This cell culture is highly sensitive to chemical and mechanical manipulations, which can greatly impact the quality of the culture and subsequent results. In order to enhance reproducibility of hNSC study findings, we have developed specific protocols on how to handle and treat hNSCs to reduce cell death, premature differentiation, and genetic mutation.
The following protocol details expansion and differentiation of hNSC populations, while emphasizing the technical subtleties that will help reduce variation in results. We believe this protocol is most helpful to investigators who wish to establish hNSC cultures in their respective labs to address a variety of projects concerning the impact of exogenous stimuli on neural stem cell survival and differentiation. The hNSCs used in this protocol were originally derived from discarded human fetal cortexes in the first trimester, and their isolation and initial expansion are described in a previous publication.8 Following this initial expansion, vials of cells were frozen and stored in liquid nitrogen; these are the vials of cells used in this protocol. All protocol procedures adhere to the University of Texas Medical Branch ethics guidelines concerning the use of human tissue samples, and the cell lines were approved by the Institutional Biosafety Committee.
Protocol
Media preparation and initial seeding
- Before beginning the experiments, prepare a stock of culture media.
- 210 mL DMEM (D)
- 70 mL F12 (F)
- 4.2 mL HEPES buffer (H)
- 4.2 mL glucose (G)
- 2.8 mL penicillin/streptomycin (PS)
Note: This medium is referred to as “DMEM/F12 stock medium” throughout the protocol.
- Twenty-four hours prior to recovery, coat a Corning T-75 flask with 5 mL of conditioned media, obtained from previous cultures of the same hNSC cell line.
- Place the coated flask in a 37°C incubator with 8.5% CO2 overnight. This process will help prevent the stem cells from adhering to the bottom of the flask and will assist in neurosphere formation.
- Approximately 10 minutes before seeding cells, warm 20 mL of DMEM/F12 stock medium in a 50 mL screw cap tube in a 37°C water bath.
- In a separate screw cap tube, warm 10 mL of DMEM/F12 stock medium in 37°C water bath for approximately 10 minutes.
- Obtain all media components listed in Table 1 and keep on ice.
- Warm 5 mL of conditioned media in 37°C water bath for approximately 10 minutes.
- Retrieve the tube containing the 20 mL DMEM/F12 stock medium and place in the tissue culture hood.
- Take 10 mL of the new media and place into a clean screw cap tube.
- Obtain a vial of frozen cells from the liquid nitrogen tank.
- Quickly thaw the vial of cells in 37°C water bath and gently invert every few seconds until fully thawed.
- In the tissue culture hood, add the thawed cells dropwise into 10 mL of DMEM/F12 stock medium.
- Centrifuge the cell suspension at 200×g for 5 minutes, and then discard supernatant.
- Resuspend the cell pellet in additional 10 mL of DMEM/F12 stock medium and centrifuge again at 200×g for 5 minutes.
- During the 5-minute spin, retrieve the pre-coated flask from the incubator and prepare the growth media by adding the growth factors listed in Table 1 to the final pre-heated 10 mL aliquot of DMEM/F12 stock medium.
Note: Mixture contains 100 mg/mL transferrin, 100 mM putrescine, 20 nM progesterone, 30 nM sodium selenite. OPTIONAL: 10% N2 supplement (Gibco).
- Remove the conditioned media from flask and add the 5 mL of pre-heated conditioned media to the flask.
- Retrieve the cells from the centrifuge and remove the supernatant, leaving the cell pellet intact.
- Resuspend cell pellet in 10 mL of freshly prepared growth media in Step 12 and add to the T-75 flask containing pre-warmed conditioned media.
- Firmly, but gently, rock the T-75 flask back and forth several times to evenly distribute cells across the flask. Loosen the cap slightly to allow airflow.
- Under a light microscope observe the cells, make notes, and take images if possible.
- Return the flask to a 37°C incubator with 8.5% CO2.
Note: 8.5%, rather than 5%, CO2 is needed to keep the serum-free media at pH 7.1–7.4.
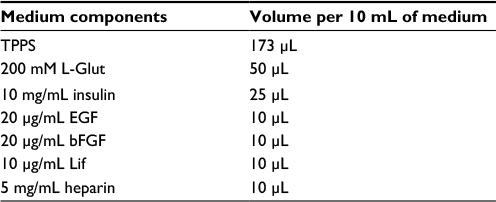 | Table 1 Growth factors for new proliferation media Abbreviations: TPPS, transferrin, putrescine, progesterone, sodium selenite; L-Glut, L-glutamine; EGF, epidermal growth factor; bFGF: basic fibroblast growth factor; Lif, leukemia inhibitor factor. |
hNSC media change
- Every 3.5 days, change the media in the T-75 flask.
- Sterilize tissue culture hood before media change.
- Warm a 10 mL aliquot of DMEM/F12 stock medium in 37°C water bath.
- Retrieve a container of ice and all medium components listed in Table 1.
- After the DMEM/F12 stock medium aliquot is warmed, bring it into the tissue culture hood and add the growth factors according to Table 1.
- Gently tilt flask to the side, allowing spheres to sink to the bottom of the flask. Look closely and carefully to make sure spheres have sunk to the bottom of the flask before removing any media.
- Remove 5 mL of conditioned media from the top of the flask, taking care not to aspirate any neurospheres.
- Place the 5 mL of conditioned media into a clean 15 mL tube.
- Remove an additional 5 mL of conditioned media from the flask and place into the same tube.
- Add 10 mL of new media into the flask with the remaining 5 mL of conditioned media.
- Set the flask down flat and check cell density under microscope. If it appears that many cells were lost, centrifuge the conditioned media at 100×g for 5 minutes, re-suspend any cells that accumulate at bottom in 1 mL of conditioned medium, and then add to flask.
- Store the unused conditioned media at 4°C to be used for coating flasks at a later point in time.
- Rock flask firmly by sliding back and forth 3–4 times on surface of biosafety hood before loosening cap to vent and placing in 37°C incubator with 8.5% CO2.
hNSC passage
Passage cells every 9–11 days depending on sphere size
- If expanding the NSCs into a new flask, make sure all new flasks are coated 24 hours prior to seeding cells on them.
- Clean the tissue culture hood thoroughly. Retrieve ice and all medium components.
- Prepare the DMEM/F12 stock medium as already described for media changes. You will need 10 mL of new media per flask.
- Prepare appropriate amount of dPBS and glucose for the trypsin solution as described in Table 2 and place in water bath to warm. Do not add trypsin or DNase at this time.
- One milliliter of solution for approximately 10 million cells or 3 mL for approximately 30 million cells.
- Obtain a clean small weigh boat, a hemocytometer, and a glass cover slip (usually sterilized and stored in 70% ethanol). Clean with 70% ethanol and allow to air dry in hood.
- Obtain flask that will be passaged from the incubator and bring into the tissue culture hood.
- Tilt flask gently and remove 5 mL of conditioned media from the top as described in the changing media procedure as already described, and put into clean 15 mL tube labeled “CM” and the date.
- Remove another 5 mL of medium and place in the CM tube; be careful not to aspirate any cells.
- Remove the remaining 5 mL of media along with the cells and place in a clean 15 mL tube labeled as “Cells”.
- Use the 3 mL of conditioned media in the “CM” tube to rinse the bottom of the flask in 3 mL portions. Then, place the 10 mL into the “Cells” tube.
- This rinsing process helps ensure all cells will be collected for passaging.
- Centrifuge “Cells” at 100×g for 5 minutes.
- While cells are spinning, obtain the dPBS/glucose solution from 37°C water bath and add the appropriate amount of trypsin and DNase according to Table 2.
- After the “Cells” centrifugation is complete, remove all supernatant and transfer it into the “CM” tube.
- Resuspend the cell pellet in the appropriate volume of trypsin solution and triturate the solution approximately 5–10 times, and then incubate at 37°C for 5 minutes.
Note: The amount of trypsin is depended upon the number of cells per T-75 flask. Generally, 1 mL of trypsin is sufficient for 7–10 million of cells, and thus 3 mL per T-75.
- During this incubation, prepare the same volume of trypsin inhibitor that was used for the trypsin solution. Prepare the trypsin inhibitor by placing 1–3 mL of conditioned media (same volume as the trypsin solution) in a “Trypsin Inhibitor” labeled tube. Refer to Table 3 for the appropriate amount of trypsin inhibitor for each volume.
- Place trypsin inhibitor at 37°C until needed.
- After 5 minutes, retrieve cells being trypsinized and triturate 5–10 times, and then incubate at 37°C for an additional 10 minutes. The trituration steps are to properly dissociate the spheres.
- At this time, obtain the tube of warmed DMEM/F12 stock medium and add the growth factors according to Table 1.
- In the last 5 minutes of the trypsin incubation, retrieve the trypsin inhibitor and place in the tissue culture hood.
- Retrieve the cells after the incubation time is complete and triturate until all spheres are dissociated (approximately 20–30 times). If spheres persist, increase the rigor of the pipetting, or pipette more.
- If there is continual difficulty dissociating spheres, spheres may have become too large and will be difficult to separate. Additionally, the trypsin amount could be incorrect or the trituration process was not vigorous enough.
- Once spheres have dissociated, immediately add the trypsin inhibitor and triturate about 5 times.
- Count the number of cells by following these steps:
- Pipette 15 µL of 0.1% trypan blue onto the small weigh boat in a droplet form.
- Add 5 µL cell suspension into the 15 uL droplet of trypan blue.
- Pipette 10 uL onto either side of a dry hemocytometer covered with the dry glass coverslip.
- Observe the cells under a light microscope and count the total number of cells in each of the four corner grids.
- Add this number together.
- Repeat counting for the other side.
- Average the two sides together.
- Multiply this number by 10,000, which will give you the total number of cells per mL.
- Multiply this number by the total number of milliliters to calculate the total number of cells in your culture.
- Calculate how much volume of cell suspension will be needed to seed 5 million cells in the T-75 flask.
- Add the appropriate volume of cells to obtain 5 million cells in a T-75 flask. Add enough conditioned media to bring the final volume of cells + conditioned media to a total of 5 mL.
- Extra cells can be plated in other T-75 flasks at a density of 5 million cells per flask, or these extra cells can be placed in a T-75 flask with new media and be frozen the next day using the methods described later.
- Add 10 mL of new media to the flask(s). The total volume of medium will be 15 mL with 5 million cells per flask.
- Rock flask firmly by sliding back and forth 3–4 times, before loosening cap and placing in a 37°C incubator with 8.5% CO2.
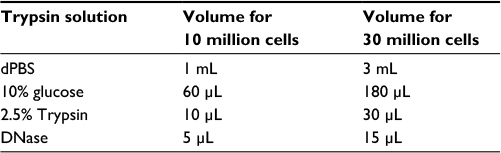 | Table 2 Preparation of trypsin |
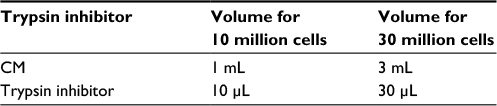 | Table 3 Preparation of trypsin inhibitor |
hNSC freezing and storage
- The day after passaging, obtain the cell flask from the incubator.
- Remove all media and cells from the flask and place in a 15 mL tube.
- Make sure there are no large spheres; large spheres or clusters of cells will not freeze well. A homogenous cell suspension of small spheres is optimal.
- Centrifuge at 216×g for 5 minutes.
- During the centrifugation process, prepare freezing media as described in Table 4. For every 5 million cells, prepare 1 mL of freezing media.
- Prepare cryopreserve vials with labels of:
- Cell name
- Passage number
- Cell number
- Initials
- Date
- After centrifugation, remove the supernatant and re-suspend cell pellet in freeze media.
- Aliquot 1 mL of cell suspension per vial and seal tightly.
- Place vials in a cryopreserve container with isopropanol and store at −80°C overnight, and then transfer to a liquid nitrogen tank storage system.
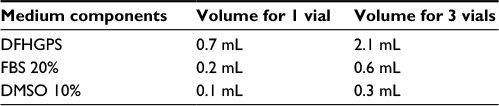 | Table 4 Preparation of freezing media |
Plating adherent hNSC for immunohistochemical stains
- The day before passaging the hNSCs, obtain a 24-well plate and sterile glass 12 mm coverslips.
- Using forceps, carefully place a single coverslip on the bottom of each well of the 24-well plate.
- Coat the wells and coverslips with 0.01% poly-D-lysine (PDL) diluted in sterile water and incubate for 1 hour at 37°C.
- Remove PDL and coat with 1 µg/cm2 laminin/PBS overnight at 37°C. If not needed the next day, store at 4°C.
- Plates coated with laminin can be stored up to 2 weeks if sealed with Parafilm as long as the coverslips do not dry out.
- Passage the cells as already described and seed the cells into the 24-well plate with coated coverslips.
- Cells should be seeded at a density approximately 1–1.5×10⁵ cells per well.
- Remaining cells can be placed in a T-75 flask to maintain the culture or frozen as already described.
- Cells can be fixed and stained for various markers at different times after seeding. For staining procedures used to validate the neural stem cell phenotype, consult the “Staining procedure” portion of this article.
ELL priming (for neuronal differentiation)
- A total of 2–3 days before priming, passage the cells as already described.
- The day before priming, coat plate or flask with PDL and laminin as already described.
- On priming day, obtain the correct number of cells from the flask by calculating the number of cells per mL in the flask. Centrifuge the cell suspension to obtain a cell pellet at 216×g for 3 minutes.
- Prepare the priming medium during centrifuge time according to Table 5.
- Aspirate laminin from the wells of the plate or flask.
- Resuspend the cell pellet with the proper volume of priming media and load into plate or flask.
- Incubate the plate at 37°C with 8.5% CO2 for 4 days.
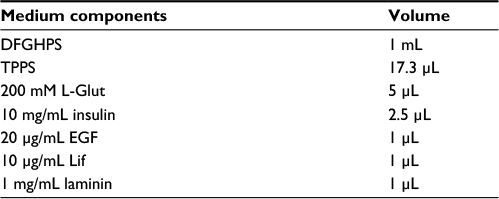 | Table 5 ELL priming media Abbreviations: ELL, epidermal growth factor, leukemia inhibitory factor, laminin; TPPS, transferrin, putrescine, progesterone, sodium selenite; L-Glut, L-glutamine; EGF, epidermal growth factor; Lif, leukemia inhibitor factor. |
FHL priming (for motor neuron differentiation)
- Follow the same protocol as already described; however, make the priming media according to Table 6.
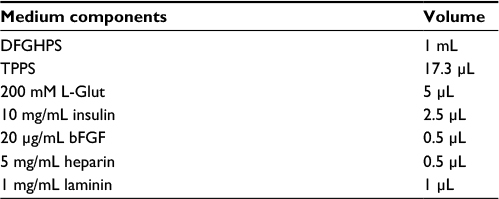 | Table 6 FHL priming media Abbreviations: FHL, basic fibroblast growth factor; TPPS, transferrin, putrescine, progesterone, sodium selenite; L-Glut, L-glutamine; bFGF: basic fibroblast growth factor. |
Neuronal differentiation after priming
- Following the 4 days of priming (as already described), prepare the differentiation media.
- DMEM/F12 stock medium (volume varies according to number of plates).
- B27 media: 1:50 dilution, 1 part B27 media (Thermo Fisher Scientific; category number 17504044) and 49 parts DMEM/F12 stock medium.
- Remove the priming media from the cells and replace with differentiation media.
- Change media every 3.5 days.
- Allow the cells to differentiate for 9 days.
Astrocyte differentiation
Note: The following protocol is derived from Life Technologies, and yields approximately 90% astrocytes in a total population.
- Two to three days prior to differentiation, passage cells.
- Thaw a bottle of Geltrex® matrix (Thermo Fisher Scientific, Cat. No. 12760) at 4°C overnight, and then on the next day dilute it in the ratio of 1:2 with ice cold DMEM/F12 media to make a 100× stock.
- Keep the bottles on ice and quickly aliquot 0.5 mL of solution into 50 mL conical tubes, which are also kept on ice. Store these tubes at –20°C.
- Thaw one of the aliquots at 4°C, and add 49.5 mL of ice cold DMEM/F12 (1:100 dilution) and then mix gently.
- Cover the surface of each plate with the solution (1.5 mL for a 35 mm dish, 3 mL for a 60 mm dish, 5 mL for a T-25 culture flask), and seal with parafilm to prevent evaporation.,
- Incubate for 1 hour at room temperature in the tissue culture hood.
- Just before use, remove all matrix solution, rinse plates once with sterile PBS containing calcium and magnesium, and then add the pre-warmed media (StemPro® NSC SFM; Thermo Fisher Scientific, Waltham, MA, USA) according to Table 7.
- Add the NSCs to the culture dish at a density of 7×10⁴ cells/cm2.
- Change medium every 3–4 days.
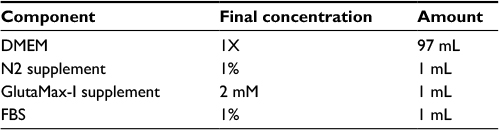 | Table 7 StemPro NSC SFM media components Note: StemPro® NSC SFM media and GlutaMax™-1 supplement are Gibco products (Thermo Fisher Scientific, Waltham, MA, USA). |
GABA neuron differentiation
Note: The following protocol yields a population of approximately 40% GABA neurons.
- Follow protocol for ELL priming with the following changes:
- Add the following during the priming period each day for duration of priming:
- 10 ng/mL BMP-4 (Sigma, product number: SRP3298).
- 5 µM creatine (Sigma, category number: C0780-50G).
- 50 ng/mL vitamin B6 (Sigma, category number: P9755-25G).
- Differentiate neurons for 9–10 days in differentiation media as previously described in the aforementioned protocol.
- Add the following during the priming period each day for duration of priming:
Staining procedure
- Remove media from the culture plates, and rinse once with ice cold PBS.
- Remove the PBS, and cover cells with ice cold 4% paraformaldehyde. Incubate at room temperature for 20–30 minutes.
- Remove the paraformaldehyde and rinse cells three times with ice cold PBS, 5 minutes each.
- At this point, you can either leave the PBS for overnight and store the plate at 4°C or begin staining after the last rinse.
- After PBS rinse, block the cells for 45 minutes with a blocking solution of 5% normal serum (NS), 0.3% bovine serum albumin (BSA), and 0.25% Triton X-100 in TBS. For example, to make 1 mL of blocking solution, you would need:
- 850 µL of 0.25% Triton X-100
- 50 µL of 100% NS
- 100 µL of 3% BSA
Note: The key of preparing the blocking solution is the selection of a right NS, which is determined by the host of the secondary antibody. For example, if the secondary antibody is derived from goat, normal goat serum should be selected.
- During the blocking step, prepare the primary antibody solution.
- For validating hNSCs, proteins such as Nestin and Sox2 can be targeted using the appropriate antibody against them.
- For differentiation, markers such as MAP2 can be used to identify neuronal populations, while glial fibrillary acidic protein (GFAP) can be used to identify astrocytes.
- Various markers for specific neuronal cell types can also be used for further characterization of the cells.
- To prepare the primary antibody solution, keep all reagents on ice.
- Centrifuge the primary antibody at 12,000×g for 2 minutes at 4°C.
- Place the appropriate amount of antibody in an ice cold 0.25% Triton X-100 solution to reach the desired concentration.
- Add appropriate amount of antibody solution to each well, for example, approximately 300 µL for each well in a 24-well plate.
- Incubate the cells with primary antibody for 2 hours at room temperature or overnight at 4°C.
- After the incubation, wash cells with TBS three times at room temperature for 10 minutes each.
- Centrifuge the secondary antibody at 12,000×g for 2 minutes at 4°C.
- IMPORTANT: From now onward, all steps must be conducted in a darkened room, and antibody and cells should be protected from light as much as possible.
- Dilute the appropriate fluorescent secondary antibody (such as Alexa Fluor) to the recommended concentration (Alexa Fluor is typically 1:500) in 0.25% Triton X-100 solution.
- After the final TBS wash, add 300 µL of the secondary antibody solution to each well and incubate in the dark for at least 1 hour at room temperature.
- After the incubation, wash the cells three times with TBS for 10 minutes each.
- Dilute DAPI nuclear stain to recommended concentration in TBS (typically 1:5,000).
- After the final wash, add 300 µL of DAPI solution to each well and incubate for 5 minutes at room temperature.
- Rinse with TBS once before using a fluorescent mounting media such as Fluoromount G to mount the coverslips by placing a thin line of media on a glass slide.
- Carefully use tweezers to remove coverslips from the 24-well plate wells and place the cell surface down on the mounting media on the slide.
- Make sure to label slides with all relevant information needed to identify the cells on that slide.
- Once the cells are on the slide, place the slide in a flat slide holder.
- Cover the holder with aluminum foil to keep light away from the slides.
- Store the slides at 4°C and allow the mounting media to solidify overnight.
- The following day, observe the slide using a fluorescent microscope.
Representative results
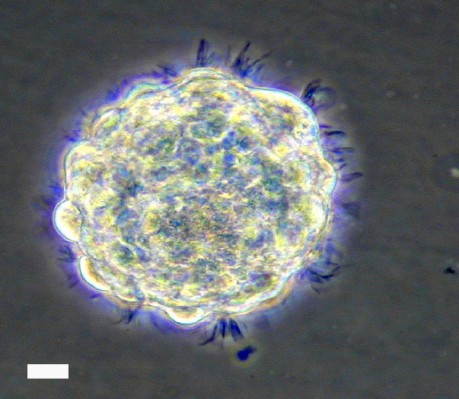
Cultured hNSCs in their proliferative stage will grow as non-adherent neurospheres (Figure 1). Immediately following hNSC passage, there will be many individual cells, which, in the next few days, will aggregate and begin to form spheres. At 9–10 days following a passage, healthy spheres should be approximately 0.5–1 mm in diameter. Spheres that grow larger than 2 mm will develop a dark center, and the growth factors in the media will not be able to reach the cells in the center of the sphere, resulting in unwanted differentiation. Healthy spheres will appear translucent and display pseudo-cilia around the edges of the sphere (Figure 1).
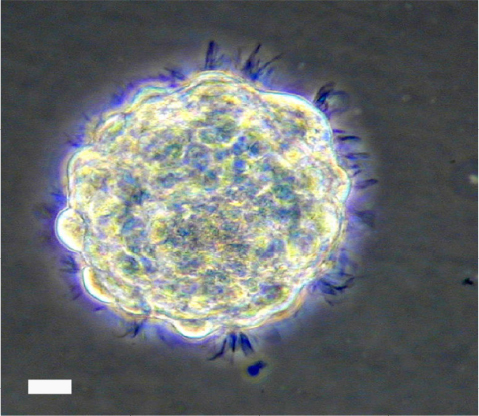 | Figure 1 Representative bright field image of hNSC sphere in culture. Note: Scale bar, 60 µm. Abbreviation: hNSC, human fetal brain neural stem cell. |
Plating neurospheres on an adherent surface for differentiation purposes will result in growth of an adherent culture (Figure 2). Priming and differentiating the cells require the cells to adhere to a coverslip at the bottom of a cell culture plate, such as a 24-well plate. The cells start to migrate out after priming and differentiating. The migration pattern is apparently different between ELL priming (Figure 2A) and FHL priming (Figure 2B).
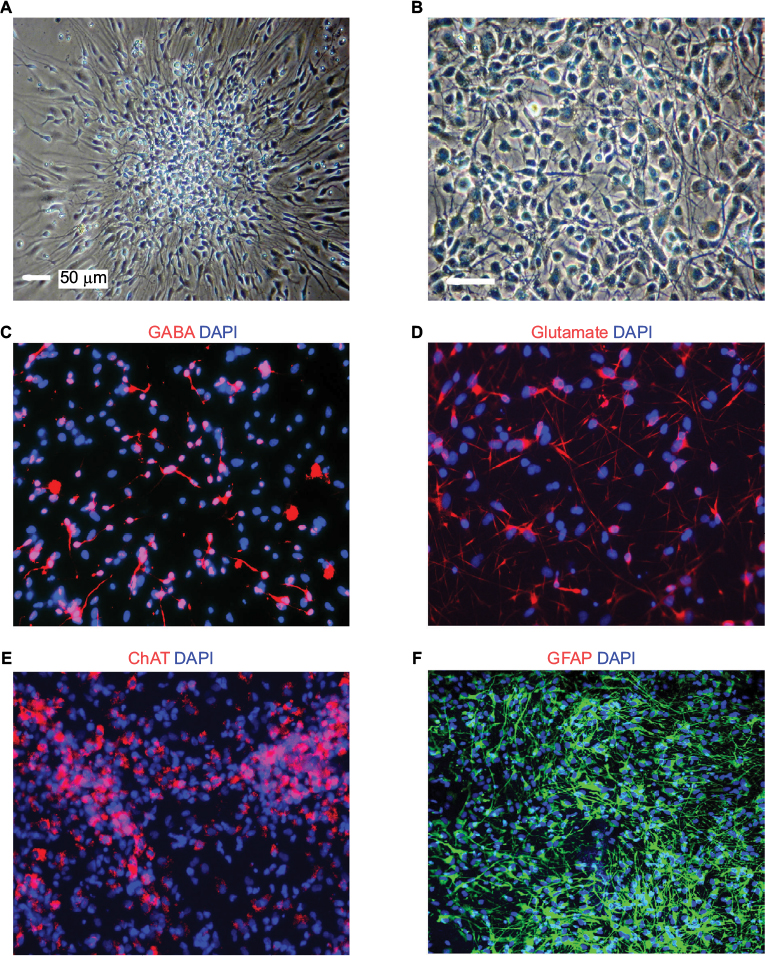 | Figure 2 Representative bright field and fluorescent images of hNSCs following various differentiation treatments. Notes: (A) Adherent neuron culture following ELL priming. (B) Adherent neuron culture following FHL priming. (C) GABAergic neurons with GABA staining (red) in neurons generated from ELL priming and differentiation (DAPI nuclear marker in blue). (D) Glutamatergic neurons with glutamate staining (red) in neurons generated from ELL priming and differentiation (DAPI nuclear marker in blue). (E) Motor neurons with ChAT staining (red) in neurons generated from FHL priming and differentiation (DAPI nuclear marker in blue). (F) Astrocytes stained with GFAP following astrocyte differentiation. Scale bars: 50 µm in bright field images, 20 µm in fluorescent images. Abbreviations: hNSC, human fetal brain neural stem cell; ChAT, choline acetyltransferase; GFAP, glial fibrillary acidic protein; DAPI, 4',6-diamidino-2-phenylindole, dihydrochloride; ELL, epidermal growth factor, leukemia inhibitory factor, laminin; FHL, basic fibroblast growth factor. |
To identify and confirm the phenotype of neurons or astrocytes generated from the differentiation experiments, various fluorescent immunohistochemistry can be used. GABAergic or glutamatergic neurons can be stained using GABA or glutamate-specific antibodies in ELL-primed and differentiated cells, respectively (Figure 2C–D). Following FHL priming, more motor neurons are expected and therefore choline acetyltransferase can be used to identify this population (Figure 2E). These results provide an example representation of immunocytochemical findings. Full immunocytochemical and electrophysiological characterization of these cells has been previously published, and can be referred to for additional neuronal markers and electrophysiological profile.9 Although the priming step is used to achieve a higher percentage of neurons following differentiation, there will still be astrocytes in the culture. GFAP can be used to label astrocytes in order to quantify which percentage of differentiated cells became astrocytes or neurons. Additionally, GFAP can be used to identify astrocytes following enriched astrocyte differentiation (Figure 2F).
Discussion
In this protocol, we have described key steps and considerations for reducing variability in culturing methods in order to obtain a productive hNSC culture. The ability to culture and manipulate hNSCs provides a critical tool that can be used for a variety of purposes from modeling human disease to high throughput drug screening.6–7,10–12 One of the challenges with hNSC culture is maintaining the “stemness” of the culture. Svendsen et al developed a method in 1998 to maintain primary human fetal neural stem cells in culture by chopping neurospheres into pieces.8 Svendsen’s protocol has been used and adjusted in a number of laboratories. In our protocol, half the amount of FGF and heparin is used. In addition, we developed a way to completely dissociate neurospheres into single cells, which allows us to propagate hNSCs for about 100 passages and with minimal chromosomal alteration.7,9 Another crucial part of culturing hNSCs is the passaging step. This step is the source of many errors. It is important to note if there are many dead or non-dissociated cells following the trypsinization process. If there are many dead cells, reduce the number of times of pipetting up and down during dissociation, as too much mechanical stress can result in cell death. Alternatively, if large amounts of clustered cells remain, the dissociation will have to be more vigorous, as these clusters will quickly become large spheres that will promote cell differentiation in culture.
Using the aforementioned protocol, hNSCs were propagated and then transplanted into the brains of mice following traumatic brain injury, which resulted in decreased accumulation of amyloid precursor protein.13 This transplantation reduced microglial activation and diminished inflammatory mediators.13 These results pose further interesting applications of hNSC culture for transplantation and mediation of glial responses. The role of glial progenitors and transplantation is critically important due to their proven role in rescuing myelination phenotype in mice.14–16
NSCs play pivotal roles in everything from infection to psychiatric disorders. Multiple studies from our lab have utilized these hNSC culture and differentiation techniques to improve efficacy of stem cell transplantation in the context of traumatic brain and spinal cord injury.9,17,18 We have also used hNSC culture to investigate Zika virus-associated neuropathology.7 Since these hNSCs are not genetically modified and isolated from individual donors, it is possible to investigate factors that impact how individuals will respond to various stimuli such as Zika virus.7 In vitro studies using hNSCs not only provide unique insight into basic stem cell behavior, but also provide an excellent platform to conduct pre-clinical research. Recently, this hNSC culture system was used to screen FDA-approved drugs to prevent Zika virus infection of NSCs.6,7
Acknowledgment
This work was supported by funds from the John S Dunn Foundation, TIRR Foundation , the Coalition for Brain Injury Research, and the Moody Project to PW.
Author contributions
All authors contributed toward data analysis, drafting and critically revising the paper, gave final approval of the version to be published, and agree to be accountable for all aspects of the work.
Disclosure
The authors report no conflicts of interest in this work.
References
Nam H, Lee KH, Nam DH, Joo KM. Adult human neural stem cell therapeutics: current developmental status and prospect. World J Stem Cells. 2015;7(1):126–136. | ||
Reekmans K, Praet J, Daans J, et al. Current challenges for the advancement of neural stem cell biology and transplantation research. Stem Cell Rev. 2012;8(1):262–278. | ||
Lee Y, Dawson VL, Dawson TM. Animal models of Parkinson’s disease: vertebrate genetics. Cold Spring Harb Perspect Med. 2012;2(10). pii: a009324. | ||
Mertens J, Marchetto MC, Bardy C, Gage FH. Evaluating cell reprogramming, differentiation and conversion technologies in neuroscience. Nat Rev Neurosci. 2016;17(7):424–437. | ||
Thonhoff JR, Ojeda L, Wu P. Stem cell-derived motor neurons: applications and challenges in amyotrophic lateral sclerosis. Curr Stem Cell Res Ther. 2009;4(3):178–199. | ||
Barrows NJ, Campos RK, Powell ST, et al. A screen of FDA-approved drugs for inhibitors of Zika virus infection. Cell Host Microbe. 2016;20(2):259–270. | ||
McGrath EL, Rossi SL, Gao J, et al. Differential responses of human fetal brain neural stem cells to Zika virus infection. Stem Cell Reports. 2017;8(3):715–727. | ||
Svendsen CN, ter Borg MG, Armstrong RJ, et al. A new method for the rapid and long term growth of human neural precursor cells. J Neurosci Methods. 1998;85(2):141–152. | ||
Wu P, Tarasenko YI, Gu Y, Huang LY, Coggeshall RE, Yu Y. Region-specific generation of cholinergic neurons from fetal human neural stem cells grafted in adult rat. Nat Neurosci. 2002;5(12):1271–1278. | ||
Jakel RJ, Schneider BL, Svendsen CN. Using human neural stem cells to model neurological disease. Nat Rev Genet. 2004;5(2):136–144. | ||
López-García I, Gerő D, Szczesny B, et al. Development of a stretch-induced neurotrauma model for medium-throughput screening in vitro: identification of rifampicin as a neuroprotectant. Br J Pharmacol. Epub 2016 Oct 9. | ||
Mich JK, Signer RA, Nakada D, et al. Prospective identification of functionally distinct stem cells and neurosphere-initiating cells in adult mouse forebrain. Elife. 2014;3:e02669. | ||
Gao J, Grill RJ, Dunn TJ, et al. Human neural stem cell transplantation-mediated alteration of microglial/macrophage phenotypes after traumatic brain injury. Cell Transplant. 2016;25(10):1863–1877. | ||
Lyczek A, Arnold A, Zhang J, et al. Transplanted human glial-restricted progenitors can rescue the survival of dysmyelinated mice independent of the production of mature compact myelin. Exp Neurol. 2017;291:74–86. | ||
Windrem MS, Schanz SJ, Guo M, et al. Neonatal chimerization with human glial progenitor cells can both remyelinate and rescue otherwise lethally hypomyelinated shiverer mouse. Cell Stem Cell. 2008;2(6):553–565. | ||
Sandrock RW, Wheatley W, Levinthal C, et al. Isolation, characterization, and preclinical development of human glial-restricted progenitor cells for treatment of neurological disorders. Regen Med. 2010;5(3):381–394. | ||
Gao J, Prough DS, McAdoo DJ, et al. Transplantation of primed human fetal neural stem cells improves cognitive function in rats after traumatic brain injury. Exp Neurol. 2006;201(2):281–292. | ||
Tarasenko YI, Gao J, Nie L, et al. Human fetal neural stem cells grafted into contusion-injured rat spinal cords improve behavior. J Neurosci Res. 2007;85(1):47–57. |
 © 2018 The Author(s). This work is published and licensed by Dove Medical Press Limited. The full terms of this license are available at https://www.dovepress.com/terms.php and incorporate the Creative Commons Attribution - Non Commercial (unported, v3.0) License.
By accessing the work you hereby accept the Terms. Non-commercial uses of the work are permitted without any further permission from Dove Medical Press Limited, provided the work is properly attributed. For permission for commercial use of this work, please see paragraphs 4.2 and 5 of our Terms.
© 2018 The Author(s). This work is published and licensed by Dove Medical Press Limited. The full terms of this license are available at https://www.dovepress.com/terms.php and incorporate the Creative Commons Attribution - Non Commercial (unported, v3.0) License.
By accessing the work you hereby accept the Terms. Non-commercial uses of the work are permitted without any further permission from Dove Medical Press Limited, provided the work is properly attributed. For permission for commercial use of this work, please see paragraphs 4.2 and 5 of our Terms.